Visual Studio C Project Er Diagram
This article will help you to develop a library management system in Visual basic 6.0 with MS Access as database. To help you understand the project, we have included system diagram , er diagram, table design in MS Access and VB 6 form designs.
User Activities
Since, this is a medium size project we don't need use- case diagrams. However, you are free to use them and modify the project. The main activities of the library management system are:
- Managing members information that includes adding, deleting, updating, and displaying member records.
- Each library member including admin must login to perform any transaction. Therefore, a user ID and password is given to every member.
- Managing book details in the library such as adding , deleting, updating, and displaying book information. Each book has member ID of the person who borrowed the book recently. Therefore, looking at book details we know who has the book from the library.
- Every member can check the availability of the book before borrowing it.
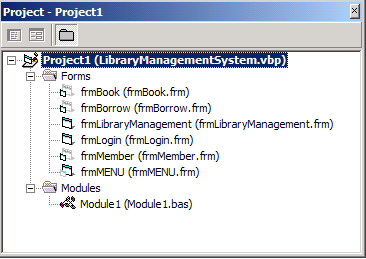
The library management system you develop must contain the following modules.
- frmLibraryManagement (Main Form)
- frmLogin (Login Form)
- frmBook (Book Form)
- frmMember (Member Form)
- frmBorrow (Book Borrow Form)
- frmMenu (MDI Form)
- Module1.bas (Module)
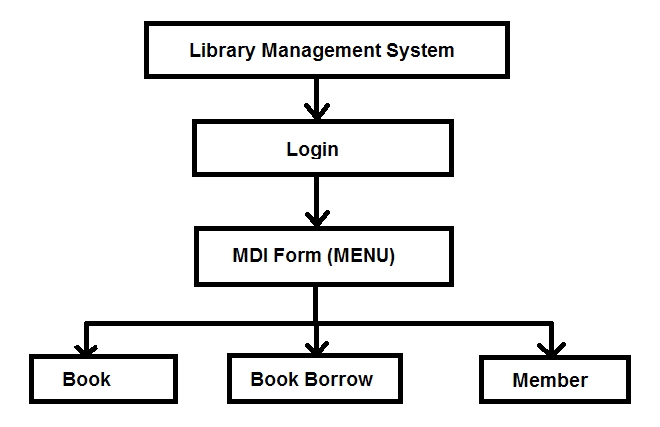
System Design
The library management main form with login button is displayed to the users. The users login to access the menu (MDI Form). The users can manage books or members at anytime within menu form . Also,members can check availability of books and borrow it if available.
The system diagram shows how the overall system works.
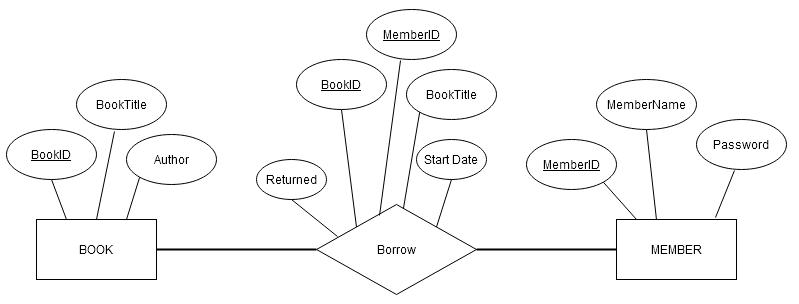
Data Model – ER Diagram
The ER diagram or entity-relationship diagram begins with identifying all entities of the project. You can write activities or use an activity diagram to identify entities.
- Member has user ID and password.
- Member can borrow books and return after use.
- A single book is allocated to only one member.
- Member can check availability of a book.
- Book details and Catalog of all books in library.
From above description we identified three entities and their relationships.
- Borrow and Return
- Library member
- Book Details
The ER diagram is below shows relationship between all entities.
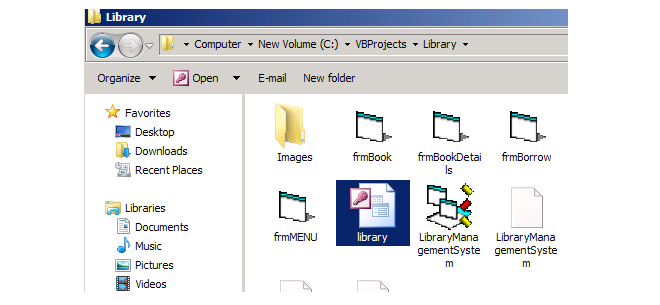
Location of the Database
In the next section, you will be creating a database in MS Access 2003; therefore, you must create the database in following location – C:/VBProjects/Library/library.mdb for this project to work. If the path is incorrect, the program will not run successfully.
Relational Model – Tables
Now we need to convert the ER Model to a Relational Model which means creating a table for each entity in the ER Model.
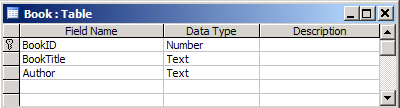
Book Table
The book table in Access Design View is given below. One of the Field Name is "Primary Key", in this case, BookID.
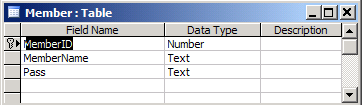
Member Table
The screenshot for the Member table in Microsoft Access Design View is given below. The Field Name "MemberID" is the "Primary Key" for this table".
Borrow Table
The third table in MS Access Design View is Borrow. This table has multiple fields that serve as the "Primary Key". The primary key are BookID, MemberID, and Return.
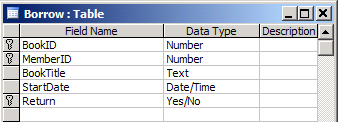
Note: Primary Key is a field that uniquely identifies each row in the table.
Relationship
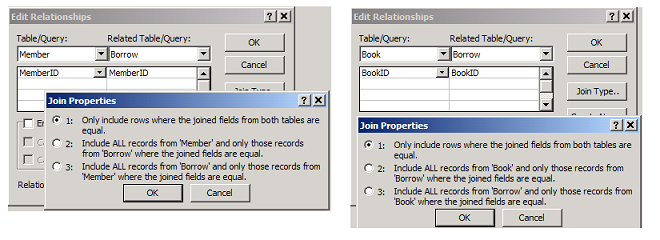
A relationship is MS Access is similar to the e-r diagram we created previously. We can use the e-r diagram to create relationships between tables.
To view or create relationships among tables, go to Database Tool from the Toolbar > [Click] Relationship under Show/Hide.

The relationship between Member and Borrow is called One-to-Many and the relationship between Book and Borrow is One-to-Many.
Connect to MS Access Database Using Module1.bas
All form need to connect to Microsoft Access Database but you may have to write the code for connection in each form. It there is a large number of forms in the project, say 10, then these extra line of codes become redundant. To save us from this trouble, create Module1.bas file from Project1.vbp windows.The code for Module is given below.
Public con As New ADODB.Connection Public rs As New ADODB.Recordset Public constr As String Public Sub loadcon() constr = "Provider=Microsoft.Jet.OLEDB.4.0;Data Source=C:\VBProjects\Library\library.mdb;Persist Security Info=False" con.Open constr End Sub Components for frmLibraryManagement
You can design the interface for each of the forms in Visual Basic now. However, you must rename them properly for sake of coding. Let's create components for frmLibraryManagement as follows and rename them.
Form Details
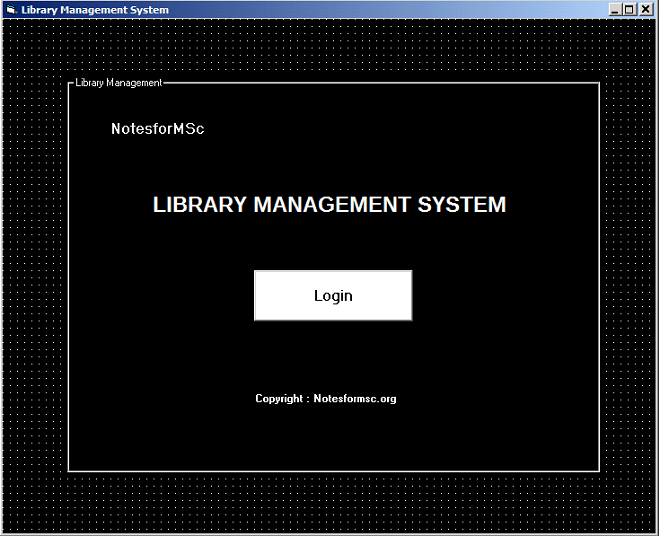
Name:frmLibraryManagement Caption :LIBRARY MANAGEMENT SYSTEM BackColor :Window Text ForeColor : Highlight Text Now add a frame control and add all other controls on top of it.
Frame
Name:frameLibraryManagement Caption :Library Management BackColor :Window Text ForeColor : Highlight Text Labels
Name : lblLibraryManagement Caption : LIBRARY MANAGEMENT SYSTEM BackColor :Window Text ForeColor : Highlight Text Font :Arimo 18px Bold Name : lblCompany Caption : NotesforMSc BackColor :Window Text ForeColor : Highlight Text Font : MS Sans-serif 12px Bold Name : lblCopyright Caption : Copyright : https://notesformsc.org BackColor :Window Text ForeColor : Highlight Text Font : MS Sans-serif px Bold Buttons
Name : cmdLogin Caption : Login BackColor : Button Highlight Font : MS Sans-serif 12px Bold Style :1-Graphical Code for frmLibraryManagement
Private Sub cmdLogin_Click() frmLogin.Show Unload Me End Sub Components for frmLogin
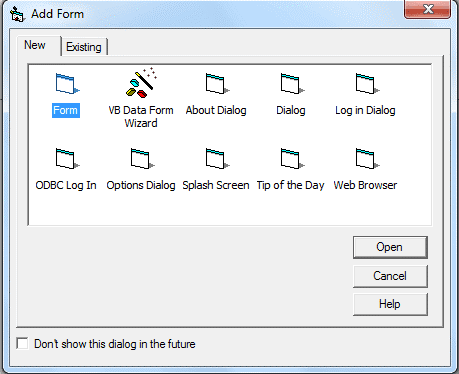
The login screen is different because you want password to be hidden when you type them. To create Login dialog, {Right-Click] Project.vbp > Select Add > [Click] Form. The new form dialog box will appear, select Log in Dialog.
Now we must rename and change the code for frmLogin.

Form Details
Name : frmLogin Caption :Login BackColor: WindowText ForeColor : Highlight Text Labels
Name : lblUserID Caption : UserID BackColor : Window Text ForeColor : Highlight Text Name : lblPassword Caption : Password BackColor : Window text ForeColor : Highlight Text Text-Boxes
Name: txtUserID Text : 'leave blank' Name : txtPassword Text : 'leave blank' Buttons
Name : cmdOk Caption : OK Name: cmdCancel Caption : Cancel Code for frmLogin
Option Explicit Public LoginSucceeded As Boolean Private Sub cmdCancel_Click() 'set the global var to false 'to denote a failed login LoginSucceeded = False Me.Hide End Sub Private Sub cmdOK_Click() rs.Open "SELECT * FROM Member ", con, adOpenDynamic, adLockReadOnly While Not rs.EOF If rs!MemberID = Val(txtUserID) Then 'check for correct password' If rs!Pass = txtPassword Then 'place code to here to pass the ' 'success to the calling sub' 'setting a global var is the easiest' LoginSucceeded = True frmMENU.Show Me.Hide con.Close Exit Sub Else MsgBox "Invalid Password, try again!", , "Login" txtPassword.SetFocus SendKeys "{Home}+{End}" End If End If rs.MoveNext Wend End Sub Private Sub Form_Load() Call loadcon End Sub Components for frmBook
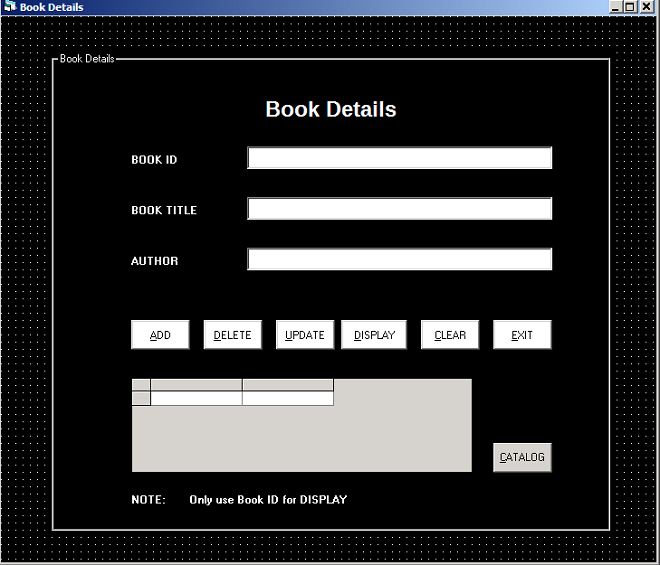
All details of books are available from this form.You can add new books, delete a book, update book information, and view the entire books in the library from this form.
Form Details
Name : frmBook Caption : Book Details BackColor : Window Text ForeColor : Highlight Text First create a single frame control and add all other controls on top of it.
Name : frameBook Caption : Book Details BackColor : Window Text ForeColor : Highlight Text Labels
Name : lblBookMain Alignment : Center Caption : Book Details BackColor : Window Text ForeColor : Highlight Text Font : Arimo 18px Bold Name : lblBookID Alignment : Center Caption : BOOK ID BackColor : Window Text ForeColor : Highlight Text Font : MS Sans-serif 8px Bold Name : lblBookTitle Alignment : Center Caption : BOOK TITLE BackColor : Window Text ForeColor : Highlight Text Font : MS Sans-serif 8px Bold Name : lblAuthor Alignment : Center Caption : AUTHOR BackColor : Window Text ForeColor : Highlight Text Font : MS Sans-serif 8px Bold Name : lblBNote Alignment : Center Caption : NOTE: BackColor : Window Text ForeColor : Highlight Text Font : MS Sans-serif 8px Bold Name : lblBInstruction Alignment : Center Caption : Only use BOOK ID for DISPLAY BackColor : Window Text ForeColor : Highlight Text Font : MS Sans-serif 8px Bold Textboxes
Name : txtBookID Text :'leave empty' Name : txtBookTitle Text :'leave empty' Name :txtAuthor Text: 'leave empty' Buttons
Name : cmdBAdd Caption : &ADD BackColor : Button Highlight Style : 1-Graphical Name : cmdBDelete Caption : &DELETE BackColor : Button Highlight Style : 1-Graphical Name : cmdBUpdate Caption : &UPDATE BackColor : Button Highlight Style : 1-Graphical Name : cmdBDisplay Caption : &DISPLAY BackColor : Button Highlight Style : 1-Graphical Name : cmdClear Caption : &CLEAR BackColor : Button Highlight Style : 1-Graphical Name : cmdBExit Caption : &EXIT BackColor : Button Highlight Style : 1-Graphical Name : cmdBCatalog Caption : &CATALOG BackColor : Button Highlight Style : 1-Graphical DataGrid Control
Name : BookFinder Code for frmBook
Option Explicit Private Sub cmdBAdd_Click() Call loadcon con.Execute "INSERT INTO Book (BookID, BookTitle, Author) VALUES (" & txtBookID & ",'" & txtBookTitle & "','" & txtAuthor & "')" MsgBox ("Record Inserted Successfully") con.Close End Sub Private Sub cmdBCatalog_Click() Call loadcon rs.CursorLocation = adUseClient rs.Open "Book", con, adOpenKeyset, adLockBatchOptimistic, adCmdTable If Dir$("C:/VBProjects/Library/savebookquery.xml") <> "" Then Kill "C:/VBProjects/Library/savebookquery.xml" End If rs.Save "C:/VBProjects/Library/savebookquery.xml", adPersistXML rs.Close con.Close Set rs = Nothing rs.Open "C:/VBProjects/Library/savebookquery.xml", , adOpenKeyset, adLockBatchOptimistic, adCmdFile Set BookFinder.DataSource = rs Set rs = Nothing End Sub Private Sub cmdBDelete_Click() Call loadcon con.Execute "DELETE * FROM Book WHERE BookID = " & txtBookID & "" MsgBox ("Record Deleted Successfully") con.Close End Sub Private Sub cmdBDisplay_Click() Call loadcon rs.CursorLocation = adUseClient rs.Open "SELECT Book.[BookID], Book.[BookTitle],Borrow.[MemberID],Member.[MemberName],Borrow.[StartDate] FROM Book,Borrow,Member WHERE Book.[BookID] = " & txtBookID & " And Book.[BookID]= Borrow.[BookID]And Borrow.[MemberID]=Member.[MemberID] And Borrow.[Return] = 0", con, adOpenDynamic, adLockOptimistic If Dir$("C:/VBProjects/Library/savebookdisplay.xml") <> "" Then Kill "C:/VBProjects/Library/savebookdisplay.xml" End If rs.Save "C:/VBProjects/Library/savebookdisplay.xml", adPersistXML rs.Close con.Close Set rs = Nothing rs.Open "C:/VBProjects/Library/savebookdisplay.xml", , adOpenKeyset, adLockBatchOptimistic, adCmdFile Set BookFinder.DataSource = rs Set rs = Nothing End Sub Private Sub cmdBExit_Click() Unload Me End Sub Private Sub cmdBUpdate_Click() Call loadcon con.Execute "UPDATE Book SET BookTitle = '" & txtBookTitle & "', Author = '" & txtAuthor & "' WHERE BookID = " & txtBookID & "" MsgBox ("Record Updated Successfully") con.Close End Sub Private Sub cmdClear_Click() txtBookID.Text = " " txtBookTitle.Text = " " txtAuthor.Text = " " End Sub Components for frmMember
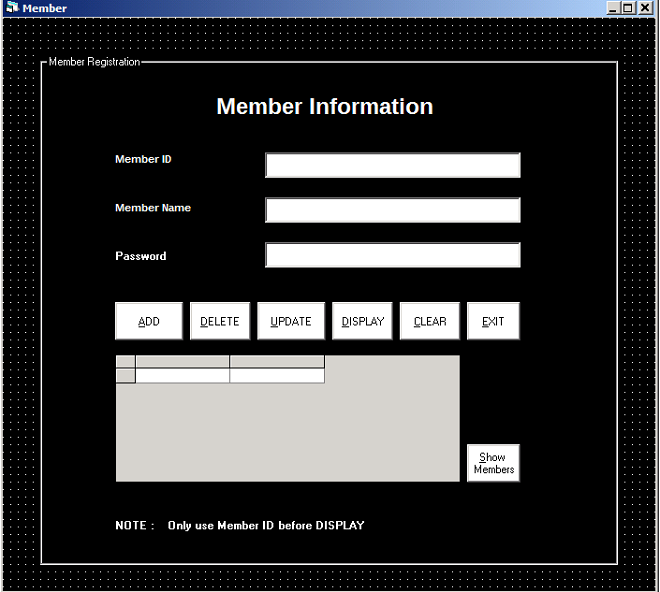
This form will provide information about library members including the book they currently borrowed. You can create new members, delete members, and update their information except except MemberID.
Form Details
Name : frmMember Caption : Member BackColor : Window Text ForeColor : Highlight Text Frame Control
Name : frameMember Caption : Member Registration BackColor : Window Text ForeColor : Highlight Text Now you can start adding all the other control on top of frame. You want to make controls visible on frame,then right click frame and click send to back.
Labels
Name :lblMemberMain Alignment :Center Caption : Member Information BackColor : Window Text ForeColor : Highlight Text Font : Arimo 18px Bold Name :lblMID Caption : Member ID BackColor : Window Text ForeColor : Highlight Text Font :MS Sans-serif 8px Bold Name :lblMName Caption : Member Name BackColor : Window Text ForeColor : Highlight Text Font :MS Sans-serif 8px Bold Name :lblMNote Caption : NOTE: BackColor : Window Text ForeColor : Highlight Text Font :MS Sans-serif 8px Bold Name :lblMInstruction Caption : Only use Member ID before DISPLAY BackColor : Window Text ForeColor : Highlight Text Font :MS Sans-serif 8px Bold Textboxes
Name: txtMID Text :'leave blank' Name: txtMName Text :'leave blank' Name: txtMPass Text :'leave blank' Buttons
Name :cmdMAdd Caption : &ADD BackColor : Window Text Style : 1-Graphical Name :cmdMDel Caption : &DELETE BackColor : Window Text Style : 1-Graphical Name :cmdMUpdate Caption : &UPDATE BackColor : Window Text Style : 1-Graphical Name :cmdMDisplay Caption : &DISPLAY BackColor : Window Text Style : 1-Graphical Name :cmdMClear Caption : &CLEAR BackColor : Window Text Style : 1-Graphical Name :cmdMExit Caption : &EXIT BackColor : Window Text Style : 1-Graphical Name :cmdMAllMember Caption : &Show Members BackColor : Window Text Style : 1-Graphical DataGrid Control
Name :MemberFinder Code for frmMember
Private Sub cmdAllMember_Click() Call loadcon rs.CursorLocation = adUseClient rs.Open "Member", con, adOpenKeyset, adLockBatchOptimistic, adCmdTable If Dir$("C:/VBProjects/Library/saveshowmembers.xml") <> "" Then Kill "C:/VBProjects/Library/saveshowmembers.xml" End If rs.Save "C:/VBProjects/Library/saveshowmembers.xml", adPersistXML rs.Close con.Close Set rs = Nothing rs.Open "C:/VBProjects/Library/saveshowmembers.xml", , adOpenKeyset, adLockBatchOptimistic, adCmdFile Set MemberFinder.DataSource = rs Set rs = Nothing End Sub Private Sub cmdMAdd_Click() Call loadcon con.Execute "INSERT INTO Member (MemberID,MemberName,Pass) VALUES (" & txtMID & ",'" & txtMName & "','" & txtMPass & "')" MsgBox ("Record Inserted Successfully") con.Close End Sub Private Sub cmdMClear_Click() txtMID.Text = " " txtMName.Text = " " txtMPass.Text = " " End Sub Private Sub cmdMDel_Click() Call loadcon con.Execute "DELETE * FROM Member WHERE MemberID = " & txtMID & "" MsgBox ("Record Deleted Successully") con.Close End Sub Private Sub cmdMDisplay_Click() Call loadcon rs.CursorLocation = adUseClient rs.Open "SELECT Member.[MemberID],Member.[MemberName],Borrow.[Bookid],Borrow.[bookTitle]FROM Member, Borrow WHERE Member.[MemberID]= " & txtMID & " And Member.[MemberID] = Borrow.[MemberID] And Borrow.[Return]= 0", con, adOpenDynamic, adLockOptimistic If Dir$("C:/VBProjects/Library/savememberdisplay.xml") <> "" Then Kill "C:/VBProjects/Library/savememberdisplay.xml" End If rs.Save "C:/VBProjects/Library/savememberdisplay.xml", adPersistXML rs.Close con.Close Set rs = Nothing rs.Open "C:/VBProjects/Library/savememberdisplay.xml", , adOpenKeyset, adLockBatchOptimistic, adCmdFile Set MemberFinder.DataSource = rs Set rs = Nothing End Sub Private Sub cmdMExit_Click() Unload Me End Sub Private Sub cmdMUpdate_Click() Call loadcon con.Execute "UPDATE Member SET MemberName = '" & txtMName & "',Pass = '" & txtMPass & "' WHERE MemberID = " & txtMID & "" MsgBox ("Record Updated Successfully") con.Close End Sub Components for frmBorrow
The form Borrow allows you to check the availability of books, and if the book is available you can borrow it. If member wants to return the book they can enter details of the book and return it immediately.
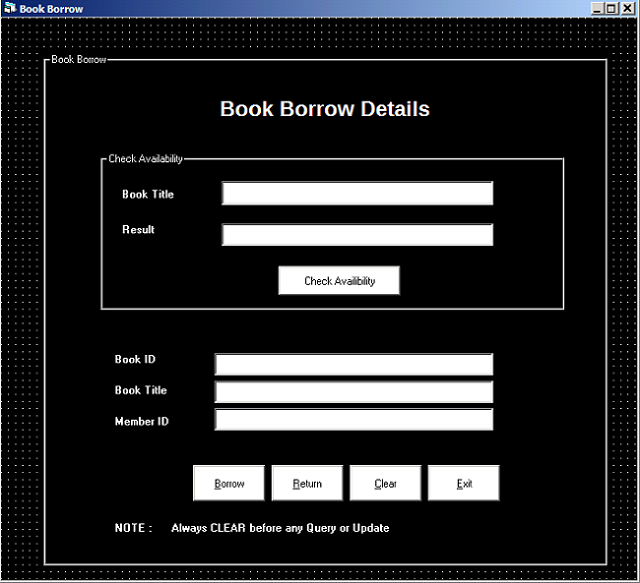
Form Borrow Details
Name : frmBorrow Caption : Book Borrow BackColor : Window Text ForeColor : Highlight Text Frame Controls
Name : frameBookBorrow Caption : Book Borrow BackColor : Window Text ForeColor : Highlight Text Name : frameAvailibility Caption : Availibility BackColor : Window Text ForeColor : Highlight Text Once you have created a frame control, add other controls on top of it. Also right click frame and send to back the frame.
Under the frame book borrow add following controls.
Labels
Name : lblBorrowMain Caption : Book Borrow Details BackColor : Window Text ForeColor :Highlight Text Font : Arimo 18px Bold Name : lblBBookID Caption : Book ID BackColor : Window Text ForeColor :Highlight Text Font : MS Sans-serif 8px Bold Name : lblBTitle Caption : Book Title BackColor : Window Text ForeColor :Highlight Text Font : MS Sans-serif 8px Bold Name : lblBMemberID Caption : Member ID BackColor : Window Text ForeColor :Highlight Text Font : MS Sans-serif 8px Bold Name : lblBorrowNote Caption : NOTE: BackColor : Window Text ForeColor :Highlight Text Font : MS Sans-serif 8px Bold Name : lblBInstructions Caption : Always CLEAR before any Query or Update BackColor : Window Text ForeColor :Highlight Text Font : MS Sans-serif 8px Bold Textboxes
Name : txtBBookID Text : 'leave blank' Name : txtBTitle Text : 'leave blank' Name : txtBMemberID Text : 'leave blank' Buttons
Name : cmdBorrow Caption :&Borrow BackColor : Window Text ForeColor : Highlight Text Style :1-Graphical Name : cmdReturn Caption :&Return BackColor : Window Text ForeColor : Highlight Text Style :1-Graphical Name : cmdBClear Caption :&Clear BackColor : Window Text ForeColor : Highlight Text Style :1-Graphical Name : cmdExit Caption :&Exit BackColor : Window Text ForeColor : Highlight Text Style :1-Graphical Now you can add controls under Check Availability frame.
Labels under Check Availability
Name : lblBBookTitle Caption : Book Title BackColor : Window Text ForeColor : Highlight Text Font : MS Sans-serif 8px Bold Name : lblBResult Caption : Result BackColor : Window Text ForeColor : Highlight Text Font : MS Sans-serif 8px Bold Textboxes
Name :txtBBookTitle Text : 'leave blank' Name :txtBResult Text : 'leave blank' Buttons
Name : cmdAvailibility Caption :&Check Availibility BackColor : Window Text ForeColor : Highlight Text Style :1-Graphical Code for frmBorrow
Private Sub cmdAvailibility_Click() Call loadcon rs.CursorLocation = adUseClient rs.CursorType = adOpenStatic rs.Open "SELECT * FROM Borrow WHERE BookTitle = '" & txtBBookTitle & "' And Return = 0", con, adOpenDynamic, adLockOptimistic If rs.RecordCount > 0 Then txtBResult.Text = "Not Available" Else txtBResult.Text = "Available" End If rs.Close con.Close End Sub Private Sub cmdBClear_Click() txtBBookID.Text = "" txtBMemberID.Text = " " txtBBookTitle.Text = " " txtBResult.Text = "" txtBTitle.Text = " " End Sub Private Sub cmdBorrow_Click() Call loadcon rs.Open "INSERT INTO Borrow (BookID, MemberID, BookTitle,StartDate) VALUES (" & txtBBookID & "," & txtBMemberID & ",'" & txtBTitle & "',#" & Format(Now, "mm/dd/yyyy") & "#)", con, adOpenDynamic, adLockOptimistic MsgBox ("Book Borrowed Successully") con.Close End Sub Private Sub cmdExit_Click() Unload Me If con.State = adStateOpen Then con.Close End If End Sub Private Sub cmdReturn_Click() Call loadcon rs.CursorLocation = adUseClient rs.CursorType = adOpenDynamic rs.Open "UPDATE Borrow SET Return = 1 WHERE MemberID = " & txtBMemberID & " And BookID = " & txtBBookID & "", con, adOpenStatic, adLockReadOnly MsgBox "Book Returned Successfully" con.Close End Sub Components for frmMENU – MDI form
The frmMENU is a form with menu items and we can create a menu using the Menu Editor.
To create a MDI form, [Right-Click] Project1.vbp > Select Add > [Click] MDI Form. Create following menu items using Menu Editor.
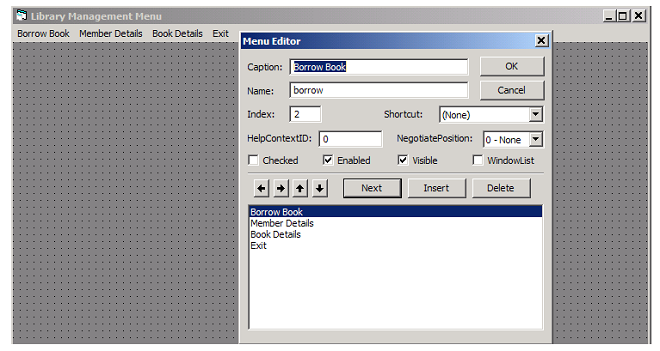
You have to create four menu items with following values. Do not change any other settings. However, you can use arrow buttons to move item up and down.
Borrow Book
Name : borrow Caption : Borrow Book Index: 3 Member Details
Name : members Caption : Member Details Index : 1 Book Details
Name : books Caption : Book Details Index : 2 Exit
Name : exit Caption : Exit Index : 0 Code for frmMenu
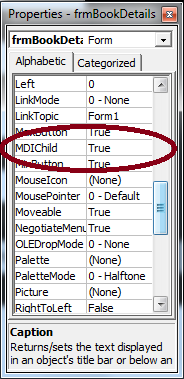
Before adding code for frmMENU, make sure you have created all other forms of the Library Management Project,
When you click on any menu item it will open another form within the parent MDI form. The other form that must open within MDI form should have their MDI child property set to True.
Add following code to frmMENU in from the code editor.
Private Sub books_Click(Index As Integer) frmBook.Show End Sub Private Sub borrow_Click(Index As Integer) frmBorrow.Show End Sub Private Sub exit_Click(Index As Integer) Unload Me End Sub Private Sub members_Click(Index As Integer) frmMember.Show End Sub The menu item allows multiple forms at the same time. If you want to allow only single form to load then hide other forms. See an example below.
Private Sub members_Click(Index As Integer) frmMember.Show frmBorrow.hide frmBook.hide End Sub Note: You cannot add the code for Module 1 because first you have to add the components for Microsoft ADO Data Control 6.0 (OLEDB) and Microsoft Data grid Control 6.0 (OLEDB).
Source: https://notesformsc.org/library-management-system/
Posted by: kentcainee0194501.blogspot.com

Post a Comment for "Visual Studio C Project Er Diagram"